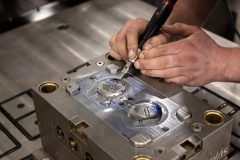
If you’ve got a broken blow mold, don’t worry – it’s something you can often fix with a few handy tips. Blow molds are tough but can break under stress. Fixing them is all about being careful and patient. You’ll need some basic tools like epoxy, clamps, and sandpaper. It’s like putting a puzzle back together. You glue it, clamp it, and let it sit until it’s as good as new. So, grab your tools, and let’s get that mold back into shape step by step. Ready to become a blow mold repair pro? Let’s get started!

How long do blow molds last?
Blow molds are those sturdy tools that shape up all sorts of plastic bottles and containers we use. They’re pretty tough and can last a long time. If you take good care of them, they can keep on churning out shapes for several years, often up to a million cycles! The lifespan really depends on how you use them and what you make with them.
The material of the blow mold also plays a big role. Aluminum molds, for example, might not last as long as those made from harder metals like steel. But, no matter the material, you should keep your molds clean and store them properly.
Using them right is key too. If you run them too hard or too hot, they might wear out quicker. Just like a favorite pair of sneakers, if you look after them and don’t push them too hard, they’ll be good for you for a longer time.
How to repair broken blow mold?
Repairing a broken blow mold is quite a task, but with patience and the right tools, you can bring it back into shape. Let’s walk through the steps one by one.
Step 1: Assess the Damage
First up, you need to take a good look at the blow mold. Figure out where it’s broken and how severe it is. Small cracks? Big break? This will tell you what you’re up against.
Step 2: Gather Your Materials
To fix the mold, you’ll need some specific materials. Get some high-strength epoxy glue, a clamp for holding pieces together, sandpaper, and maybe some putty for filling gaps.
Step 3: Prep the Surface
Now, you’ve got to prep the broken edges so the glue has a clean surface to stick to. Give them a good sanding until they’re smooth and even.
Step 4: Apply the Epoxy
Mix up the epoxy glue according to the instructions. Then, apply it carefully to the edges of the broken pieces. Make sure you cover the entire area that needs to bond.
Step 5: Clamp it Together
Press the broken pieces firmly together and use your clamps to hold them in place. Check the alignment to make sure it’s just right.
Step 6: Let it Cure
Patience is key here. You have to let the epoxy set and cure completely. This could take a few hours or as long as a day, depending on the glue.
Step 7: Remove the Clamps
Once the glue is fully set, gently remove the clamps. Be careful not to put too much stress on the repaired area.
Step 8: Check the Seal
Look at the repair spot. You want a tight seal with no gaps. If there are gaps, don’t worry, you can fill them in.
Step 9: Apply Putty if Needed
If you’ve got gaps, take some putty and apply it into those spaces. Smooth it out so it’s even with the mold’s surface.
Step 10: Sand Again
Once the putty is dry, sand the area again. You want it to be as smooth as the rest of the mold so it won’t affect your next plastic creation.
Step 11: Test the Mold
Now, it’s time to test the mold. Do a trial run with a small amount of plastic. Keep an eye on the repair to make sure it holds.
Step 12: Inspect the Result
After the test, inspect the result. If the mold holds up and the plastic shape looks good, you’ve done it!
Step 13: Keep an Eye on It
Even after a successful repair, keep an eye on the mold when you use it. If it starts to give again, you might need to repeat the process.
Step 14: Record Your Repair
Keep a record of the repair. Note down what you did and how it went. This can help if you ever need to do it again.
Step 15: Maintain Your Mold
Finally, take care of your blow mold. Clean it regularly and store it properly to avoid future breaks.
And there you have it, a step-by-step guide to repairing a broken blow mold. Remember, take your time, follow each step carefully, and your mold should be back to making perfect shapes in no time.
FAQs
What materials do I need to repair a broken blow mold?
To fix a broken blow mold, you’ll need some strong epoxy glue specifically designed for the material of your mold, sandpaper to smooth out the broken edges, clamps to hold pieces in place while the glue dries, and possibly some putty for filling in gaps. Make sure the epoxy is suitable for high temperatures if your mold goes through heat during use.
How do I prepare the surface of a broken blow mold for repair?
Start by cleaning the broken surfaces of your blow mold with a gentle cleaner to remove any oil or debris. Then, sand the edges of the break with sandpaper until they are smooth and even. This roughens up the surface a bit, which helps the glue adhere better. After sanding, wipe away any dust so the epoxy can bond directly to the material. A well-prepared surface is key to a strong, lasting repair.
How long does it take for the epoxy to cure when repairing a blow mold?
The curing time for epoxy can vary based on the product, but it typically takes between 6-24 hours to fully cure. Always check the manufacturer’s instructions for the exact time. After applying the epoxy, it’s important to leave the mold clamped and undisturbed in a well-ventilated area while it sets. This patience ensures the strongest bond and can be the difference between a temporary fix and a long-lasting repair.
Can I still use a blow mold after repairing it with putty and epoxy?
Yes, you can use a blow mold after repairing it with putty and epoxy, as long as the repair is smooth and does not interfere with the molding process. After the repair, conduct a test run with the mold to ensure the repair holds up under operational conditions. If the repair withstands the test, you can continue to use the mold as usual. Just keep an eye on the repaired area during future uses.
How can I prevent my blow mold from breaking in the future?
To prevent your blow mold from breaking, handle it with care during both use and storage. Avoid dropping or striking the mold, and keep it clean and dry when not in use. Regular maintenance checks for any signs of wear or fatigue can catch issues before they lead to breaks.